Run multi-node module tests with cloud continuous integration (CI) in Google Cloud Platform (GCP)
Categories:
Multi-node modules are modules which use multiple nodes to run integration tests. Integration testing is where you set up multiple Virtual Machines (VM) or containers, and test interactions between them. For example, this could be:
- Installing Puppet Enterprise (PE) and multiple Puppet agents.
- Setting up an NTP server and registering NTP clients.
- Installing open source Puppet Server and multiple Puppet agents.
The order you perform integration tests is important, and you need to be able to run a test on an individual system.
Running multi-node modules in GCP involves the following steps:
- Provision a node using a Bolt task.
- Set up a multi-node environment for testing using a Bolt task or plan.
- Run a test - you can use existing serverspec or Litmus helpers to set up any dependencies required by the module.
- Teardown the machine using a provision task.
This guide walks you through each step, and then provides examples of how your code would look in different environments.
Provision a node
You can use Litmus and a Bolt task to provision a VM or a container. The provision module’s available tasks spin up the test environment. When run, it creates a litmus_inventory.yaml file that allows Bolt and serverspec to communicate with that VM.
Running tasks in the provision module allows you to add arbitrary key/pair values to the Bolt inventory file. The Bolt variables allows you to have multiple labels associated with a single machine. For example:
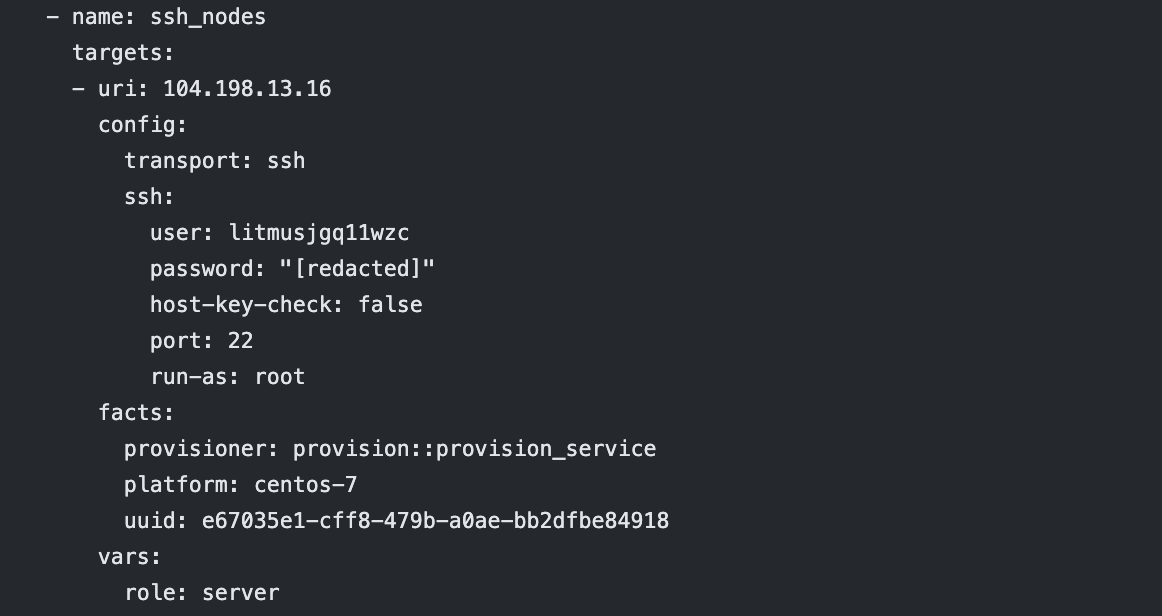 Example_websphere_provision_plan
Set up a multi-node environment for testing
To step up Litmus for your acceptance tests, you need to:
- Install a Puppet agent — you can do this using a Bolt task.
- Install a module — use a rake task that uses Puppet Development Kit (PDK) to build the module for testing, and install it on the target VM.
- Install
spec/spec_helper_acceptance_local.rb— this may require extra setup to test a module. You can use puppetlabs/puppetlabs-apache.
To set up integration testing, use a Bolt plan and inventory variable to add labels. You can then run Puppet code against a specific system. You can use puppetlabs-websphere_application_server
An example provision plan looks like:
plan websphere_application_server::provision_machines(
  Optional[String] $using = 'abs',
  Optional[String] $image = 'centos-7-x86_64'
) {
  # provision machines, set roles
  ['server', 'appserver', 'dmgr', 'ihs'].each |$role| {
    run_task("provision::${using}", 'localhost', action => 'provision', platform => $image, vars => "role: ${role}")
  }
}
You can use spec/spec_helper_acceptance_local.rb if you need to test a module — puppetlabs-websphere_application_server
Run a test
To identify which tests to run in an integeration environment, you can use rspec labelling and rake tasks.
You can label tests using rspec labeling — tag the test as an integration and keep everything else can stay the same. For example:
describe 'Install the websphere dmgr', :integration do
  before(:all) do
    @agent = WebSphereHelper.dmgr_host
    WebSphereInstance.install(@agent)
    WebSphereDmgr.install(@agent)
  end

  it 'is installed' do
    expect(WebSphereHelper.remote_file_exists(@agent, WebSphereConstants.dmgr_status))
    expect(WebSphereHelper.remote_file_exists(@agent, WebSphereConstants.ws_admin))
  end
end
To run a rake task, add to the Rakefile of the module. For example:
require 'rspec/core/rake_task'
namespace :websphere_application_server do
  RSpec::Core::RakeTask.new(:integration) do |t|
    t.pattern = 'spec/acceptance/**{,/*/**}/*_spec.rb'
    t.rspec_opts = "--tag integration"
  end
end
To target a test at a specific VM or container, you can use helper methods. You need to do this if you are using serverspec or Litmus.
The examples below show how to filter to get either a single VM or container, or how to retrieve multiple targets. puppetlabs-websphere_application_server
To identify a target node, the code would look like:
      context 'application deployment' do
        before(:all) { change_target_host('controller') }
        after(:all) { reset_target_host }
        it 'can deploy an application into a namespace and expose it' do
          run_shell('KUBECONFIG=/etc/kubernetes/admin.conf kubectl create -f /tmp/nginx.yml') do |r|
            expect(r.stdout).to match(/my-nginx created\nservice\/my-nginx created\n/)
          end
        end
To only run on tests labelled as ‘integration’, use the following command:
bundle exec rake websphere_application_server:integration
Teardown the machine
To teardown all the provisioned machines, use the following provision task:
bundle exec rake litmus:tear_down
Multi-node testing examples
Multiple Puppet agents
A setup where you have multiple Puppet agents, with a module installed and tests run.
Commands
bundle install --path .bundle/gems/ --jobs 4
bundle exec rake spec_prep
bundle exec bolt --modulepath spec/fixtures/modules plan run ntp::provision_gcp
bundle exec rake litmus:install_agent
bundle exec rake litmus:install_module
bundle exec rake ntp:integration
bundle exec rake 'litmus:tear_down'
Example puppetlabs-ntp
Puppet server and multiple agents
A setup where you have Puppet Server and multiple Puppet agents.
You can use Bolt plans for provisioning multiple nodes, with roles tagged to each of it.
Puppet has a new task that installs an open source Puppet server in the provision module.
Commands
bundle install --path .bundle/gems/ --jobs 4
bundle exec rake spec_prep
bundle exec bolt --modulepath spec/fixtures/modules plan run kubernetes::provision_cluster
bundle exec bolt --modulepath spec/fixtures/modules -i ./spec/fixtures/litmus_inventory.yaml plan run kubernetes::puppetserver_setup
bundle exec rake litmus:install_agent
bundle exec rake litmus:install_module
bundle exec rake kubernetes:integration
bundle exec rake 'litmus:tear_down'
Example puppetlabs-kubernetes
PE and agents
A setup where you have a PE server and multiple Puppet agents.
You can use Bolt plans for provisioning multiple nodes with roles tagged to each of it.
There is a task to install PE in the puppet-deploy_pe module.
provision_master/agents
Commands
bundle install --path .bundle/gems/ --jobs 4
bundle exec rake spec_prep
bundle exec bolt --modulepath spec/fixtures/modules plan run ntp::provision_gcp
bundle exec bolt --modulepath spec/fixtures/modules -i ./spec/fixtures/litmus_inventory.yaml plan run ntp::pe_server
bundle exec bolt --modulepath spec/fixtures/modules -i ./spec/fixtures/litmus_inventory.yaml plan run ntp::pe_agent
bundle exec rake litmus:install_module
bundle exec rake ntp:integration
bundle exec rake 'litmus:tear_down'
Example puppetlabs-ntp
An example plan that installs a PE server:
plan ntp::pe_server(
  Optional[String] $version = '2019.8.5',
  Optional[Hash] $pe_settings = {password => 'puppetlabs'}
) {
  # identify pe server node
  $puppet_server =  get_targets('*').filter |$n| { $n.vars['role'] == 'ntpserver' }

  # install pe server
  run_plan(
    'deploy_pe::provision_master',
    $puppet_server,
    'version' => $version,
    'pe_settings' => $pe_settings
  )
}
An example plan that installs a Puppet agent:
plan ntp::pe_agent() {
  # identify pe server and agent nodes
  $puppet_server =  get_targets('*').filter |$n| { $n.vars['role'] == 'ntpserver' }
  $puppet_agent =  get_targets('*').filter |$n| { $n.vars['role'] == 'ntpclient' }

  # install agent
  run_plan(
    'deploy_pe::provision_agent',
    $puppet_agent,
    'master' => $puppet_server,
  )
}
For more GitHub Action workflow examples, see the following:
Thanks TP for the valuable work on integration testing. Thanks Marty for the work on installing PE on cloud CI.